Showing posts with label software. Show all posts

Sunday, December 11, 2011

CREATING THE FIRE EFFECT

I've been learning more and more about using Photoshop to enhance my photos. The biggest thing I've learned so far is that you don't have to destroy the quality of your photo using programs like Photoshop. I would always over expose, over sharpen and over color all my work and never realize it. Now that I've got a handle on what can be done, my ability to create spectacular photos is well within my grasp. Here's one of the recent tutorials I've been using to help out with a fire effect. You can creat this! Cool! Although it's an advanced tutorial and will take a few hours or more to perfect, the core skills in creating the effect are valuable as well like playing with the warp and transform tools, layering and more. Give it a go and have fun!


Preview

How to Create a Flaming Photo Manipulation

Tutorial Details
  • Program: Photoshop
  • Difficulty: Advanced
  • CompletionTime: 1-2 hours

Final Product What You'll Be Creating

In this tutorial, we’ll manipulate a picture so it looks like a woman burning in flames. The idea behind this manipulation was to create a nice looking illustration, only by using simple techniques and tools such as the Brush tool and Warp command. I hope you enjoy the tutorial and try it with your own stock imagery.


Step 1

For this project, I used two nice images that suits for the manipulation; image1, image2. I would like to thank the author of this two great pictures, which is thiquinho and huibidos from sxc.hu. And before we continue with the steps, I need to inform you that this tutorial is written using Photoshop CS3.

Step 2

Let’s start with image1, open and duplicate this image by using the Image > Duplicate command from the menu bar. In the Duplicate Image dialog box, you can name it anything you like, but to follow this tutorial reference, name it "PassionFire" and hit OK. By doing this, we kept the original image. Be sure to save.

Step 3

With the "PassionFire" image active, duplicate the "background" layer. Set the foreground and background color to black and white by pressing D on the keyboard. Click the "background" layer again and fill it with the foreground color ~ which is set to black. See the images below.

Step 4

Reactivate "Layer 1," then press Command + Shift + U to apply desaturate command. Now invert the color by pressing Command + I. Your image should look like a film’s negative now.

Step 5

Duplicate "Layer 1," then apply the find edges filter from Filter > Stylized > Find Edges. Next, invert the color by pressing Command + I and change the Blending Mode to Hard light. There, your image now has contrast white line and a very dark background.

Step 6

To give the white line more contrast, duplicate the "Layer 1" copy then change the Blending Mode to Screen.

Step 7

Now we move to the second image. Drag image2 into "PassionFire" document image window using the Move tool. If the Paste profile mismatch dialog appears, just click OK to fix it.

Step 8

The fire image from "image2" should be in "Layer 2" now. Change its Blending Mode to screen, this will hide all the black colors in "Layer 2." If done right, your image should be similar to the one below.

Step 9

Duplicate "Layer 2" by pressing Command + J. Make sure you use the Screen Blending mode, same as the original "Layer 2." Next, make "Layer 2" become invisible by hiding it from the layers panel.

Step 10

Click the "Layer 2 copy" to make it active, then use the Free Transform command ( Edit > Free Transform) to rotate and resize the fire image like shown below. Don’t forget to press Enter when you’re done transforming.

Step 11

Still in the same layer, now use the warp command (Edit > Transform > Warp) to bend the fire image – so it following the hair flow. Press Enter when done. See the example below as a reference.

Step 12

If you feel the result is not quite good enough, simply use the Liquify filter to fix it. I assume you already know how to use the liquify filter; the Forward Warp tool and Twirl Clockwise tool is the only tool I used to get this result (see image below).

Step 13

Duplicate the "Layer 2" copy, then use the Free Transform command to resize and rotate the fire image in the current layer. Don’t forget to reposition the fire image too. Once you get this composition (see image below), hit Enter.

Step 14

Repeat the previous process to get the hair covered with fire. Just duplicate and modify the layer until you get all the hair part covered. If needed, use the Liquify Filter again. The end result of this process should look like the image below, notice how many layers are used.

Step 15

Okay, now activate "Layer 2" and make it visible again. Then Change the Blending Mode to Vivid Light. This step will colorize only the white line in the layer below it.

Step 16

Still in "Layer 2," apply the Free Transform command to resize and rotate the fire image like shown below. The purpose is to cover up the girl’s body and hair with the fire texture. Press Enter when you’re done transforming.

Step 17

We’re gonna blur the fire image in "Layer 2," To do so, apply the Gaussian Blur filter from the Filter > Blur > Gaussian Blur menu. Fill the Radius around 10 to 15 pixels, then click OK when done. Blurring the fire image will cause its texture to blend smoother with the layer below it.

Step 18

Now add a layer mask to "Layer 2." Then use a soft round Brush tool with Opacity at 100%. Set the brush size according to your need, then just mask until the fire outside becoming hidden. See the process below.

Step 19

Sure we will remove the white line shown in the image (marked in red rectangle below). First, add a new blank layer below "Layer 2." Then simply paint it with black using the soft round brush tool.

Step 20

Now go to the top most layer (mine is: "Layer 2 copy 6"), add two adjustment layers which is Hue/Saturation and Brightness/Contrast. Careful not to change the layer adjustment order, or the color effect will be wrong. Below you can see the setting I used to complete this step, also pay attention to the adjustment layer order.
By adding a Hue/Saturation adjustment layer, we unify all colors. The Brightness/Contrast adjustment layer brings more color contrast and makes sure the image color’s looks like real fire.

Step 21

I’m sure you notice the fire sparks effect. I create it using the Brush tool with this simple setting. No special brush needed, but if you have one that will be useful then feel free to use it. Below you can see all the settings I used within the Brush palette, of course you can change the setting as you like. Just make sure the brush spatter enough and vary the size.

Step 22

Now to use the modified brush, create a new blank layer below the adjustment layers ( mine is named "Layer 4"). Choose 50% gray from the swatches palette, then you can start creating the fire sparks. Remember not to be monotone, resize the brush size if needed. I start using a big sized brush, then reduce it to smaller size (you can change brush size faster by pressing the bracket keys on the keyboard ).
If you’re not sure how to do this steps, just imagine where and how the fire sparks will flow if it was real fire. For me, imagining stuff is very helpful.

Step 23

To make it more interesting, create a new layer and change the Blending Mode to Screen. Then use a normal soft round brush (not the one we modified earlier), with an Opacity of 50%. Just click in the part of body, neck, and hair. I’m not sure how to explain this, but you can see the difference between the above and below images.

Conclusion

And that’s all of it! Hope you learned something new and had fun. You can view the final image below or view a larger version here.
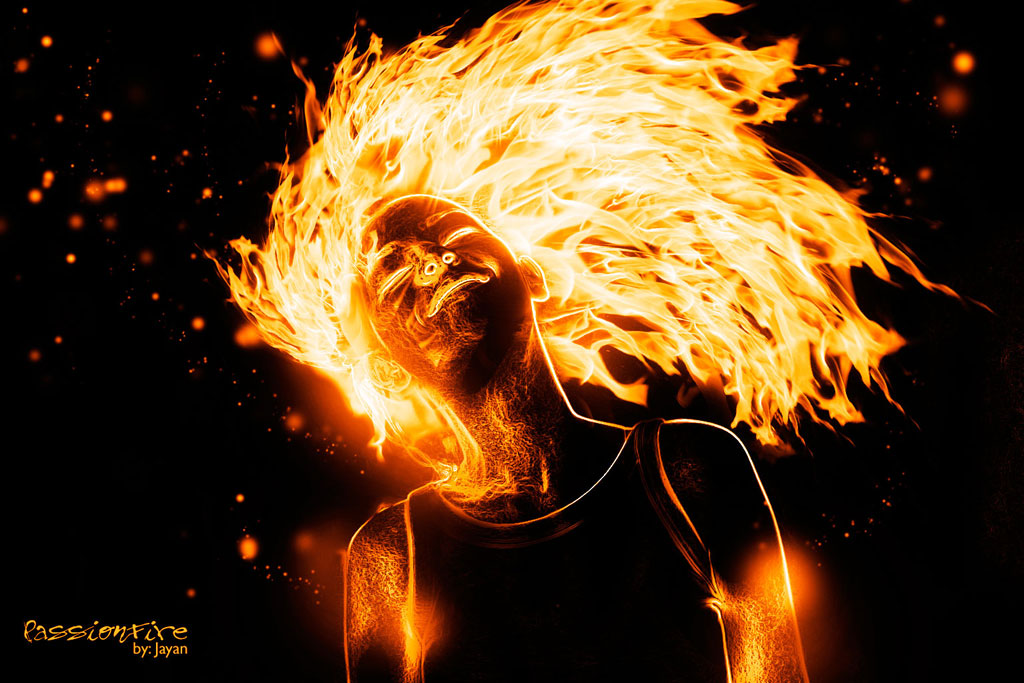
Article by Jayan Saputra

Friday, December 2, 2011

IPHONE VS. DIGITAL CAMERA!? SAY WHAT??

I'm always wondering if my bulky equipment will soon be replaced with a pocket-sized camera that will do the same thing. I'm sure it will happen the moment I upgrade to the giant $5000 pro camera with all the bells and whistles. Here's an interesting article I found on a really cool website called ars technica.


Can the iPhone 4S replace a "real" digital camera?


Can the iPhone 4S replace a "real" digital camera? Ars investigates
Clockwise from top left: Olympus XZ-1 point and shoot, Canon 20D DSLR with EF-S 10-22mm lens, iPhone 4S, Samsung Galaxy SII. Photo taken with an iPhone 4.

When Apple announced the iPhone 4S, the company certainly talked up the improvements made to the smartphone's integrated camera hardware. With 8 megapixels of resolution, a redesigned lens, and enhancements to its software, it certainly meets or exceeds the needs of most casual shooters.

Still, we here at Ars have received plenty of questions to the effect of, "can the iPhone 4S replace a 'real' camera?" That's actually a hard question to answer, because individual needs vary widely. Would a professional photographer replace her trusty DSLR with an iPhone 4S? No. But, might a casual snap shooter replace a pocket camera with an iPhone 4S? It's pretty likely.
Making a decision to ditch your camera for a smartphone is always going to be a matter of personal preference and a trade-off between convenience versus quality. With that in mind, we set out with a stable of cameras to give as fair a comparison as possible. Along with an iPhone 4S, we also took sample shots with a 5MP iPhone 4, an 8MP Samsung Galaxy SII, an 8MP Canon 20D, and a 10MP Olympus XZ-1.

There are two things we did not do, however. For one, we didn't compare every generation of iPhone. Camera+ developer Lisa Bettany already put together a really thorough comparison already, and suffice to say if you have anything older than an iPhone 4, be prepared to be blown away with the results from an iPhone 4S. If you already have an iPhone 4, the improvements to image quality are a little more subtle. But as we noted in our iPhone 4S review, the speed of the camera hardware and software is significantly improved; this alone is a significant factor that improves usability.

A photo taken with each generation of iPhone, from the original 2MP fixed focus iPhone to the 8MP autofocus iPhone 4S.

The other thing we didn't do was compare the video capabilities of the iPhone 4S. We already found the iPhone 4's 720p recording ability to be sufficient for casual use, and at least one filmmaker managed to shoot an entire film using iPhone 4s. The iPhone 4S steps that up to 1080p resolution, and some curious filmmakers at Robino Films found that in static, well-lit scenes, it compares favorably to a Canon 5D mkII. Rolling shutter effects will be a problem, and lowlight shooting introduces some artifacts, but overall the hardware performs well shooting video.

iPhone 4S / Canon 5D mkII Side by Side Comparison

What we were interested in was evaluating the iPhone 4S as a still camera that could possibly replace a 'real' digital camera. To try and keep things as fair as possible, our Canon 20D was outfitted with a Canon 10-22mm EF-S lens was set to 22mm (a roughly 35mm equivalent) and left at f/4.5. Exposure was set automatically using aperture priority, just as most smartphones do. ISO was set manually (the 20D doesn't have auto ISO available in aperture priority mode) but was set to our best guess for the situation at hand.

Likewise, the Olympus was put into aperture priority mode, with its aperture set to f/2.5—similar to the smartphones we compared against. ISO was set automatically, and the lens was left all the way at the wide end—roughly 28mm focal length equivalent.

We took a series of subjects in a couple different lighting scenarios: flowers in outdoor lighting, a building at sunset, and some shots in very low indoor lighting at home and at a bar. We'll show you our comparison shots, noting the performance in each case as well as considering what each device was like to carry, pull out, set up, and take each shot.

Outdoors


We took our band of cameras outside during a brisk autumn afternoon with a clear blue sky to capture some images in bright light. First up is a series of photos taken of a flower arrangement.
Left: iPhone 4S, 1/3500 f/2.4 ISO80. Right: iPhone 4, 1/1150 f/2.8 ISO64.

Left: iPhone 4S. Right: Samsung Galaxy SII, 1/1400 f/2.6 ISO32
Left: iPhone 4S. Right: Samsung Galaxy SII, 1/1400 f/2.6 ISO32.

Left: iPhone 4S. Right: Olympus XZ-1, 1/2000 f/2.5 ISO100
Left: iPhone 4S. Right: Olympus XZ-1, 1/2000 f/2.5 ISO100.

Left: iPhone 4S. Right: Canon 20D, 1/1000 f/4.5 ISO100
Left: iPhone 4S. Right: Canon 20D, 1/1000 f/4.5 ISO100.

Here you can see the cameras capturing lots of color. Directly comparing the iPhone 4S to the iPhone 4 in the first image, there are two important factors to notice about the improved camera: a greater dynamic range and a tendency to keep colors—especially reds—from over-saturating.

Apple claims to have improved white balance in the 4S, and as such, its images tend to be a little less cold in regular lighting; they show a little less yellow (as we'll see later) under indoor tungsten lighting compared to the iPhone 4. It's difficult to say for sure why these improvements couldn't be passed on to the iPhone 4 with software, but it's likely that the white balance improvements are at least partially due to the new 8MP sensor and its hybrid IR filter.

Our relatively high-end point-and-shoot, the Olympus XZ-1, over-exposed the image quite a bit. It's hard to say what tripped up its exposure system, but suffice it to say, having a more expensive "real" camera doesn't automatically guarantee better results. The XZ-1 has the benefit of offering a variety of manual controls, including ISO adjustments, exposure compensation, and manual exposure control that would let us dial in a better exposure if that's what we wanted.

The iPhone 4S, on the other hand, has no such control. Tapping around different areas of the viewfinder will bias the auto-exposure system for that particular part of the image, however, so there is a way to slightly override it. Still, we found that iPhone would generally nail the exposure about nine times out of ten without intervention.

At screen sizes, there really isn't much difference between the iPhone 4S, the Galaxy SII, and the Canon 20D. We note that the exposure and dynamic range of the Galaxy SII is more like the iPhone 4, while the Canon 20D's rendering is more like that of the iPhone 4S.

100 percent crop of flower images. From left to right: iPhone 4S, iPhone 4, Samsung Galaxy SII, Olympus XZ-1, Canon 20D.

Looking closer at 100 percent crops of each image—pixel peepers rejoice!—the differences are still subtle, but the iPhone 4S and iPhone 4 are clearly noisier than the Olympus or the Canon. The Galaxy SII shows signs of aggressive noise reduction that leaves odd artifacts, though at screen sizes or in smaller prints, these won't likely be noticeable. Both the iPhone 4S and Canon 20D show a little blurriness, but given the high winds on that particular day, I attribute this to a bit of motion blur, as other details in the image are sharp.

Photography and Article by Chris Foresman